- Required knowledge
- Principle of canvas animation
- What is canvas?
- Render image on canvas
- Get target canvas element by Javascript
- How to use drawImage()
- Cut image by wave shape
- imageSet():Render image on canvas.
- waveDrawing():Cut image by wave shape
- Define the position to draw and Configure superposition
- Specify cut area
- Fill the selected area in transparent
- Implement animation by the loop.
- Whole code
- If you change the wave
- At last
How to make wave animation at bottom of the image with canvas
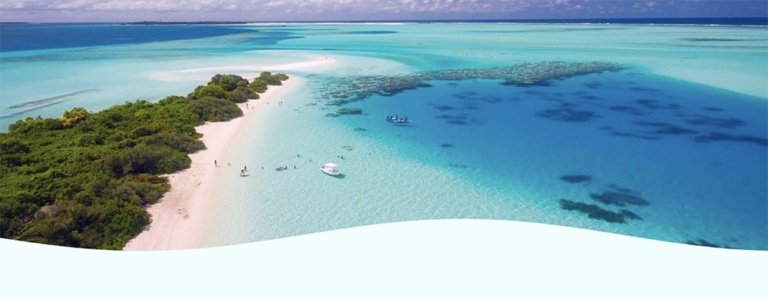
Hello developers! Thank you for reading my article. Today, I explain how to make animation with canvas as below. Responsive is not supported , but you can make it with only 70 lines of javascript.
Here, you can check it.
Required knowledge
Before explaining detail, let's check the required knowledge and principle about web canvas animation. If you well know, skip this section.
- how to set canvas with js
- how to render image on canvas with js
- Trigonometric function(very basic)
Principle of canvas animation
You can check the sample here, the animation is running correctly and I don't use movie. This animation is played on canvas element with javascript.
Waving images is difficult for using only div tag or img tag. The animation needs canvas element.
Animation is doing "Erase the image, redraw, erase, redraw ..." at an invisible speed. Also, js draws after erasing the bottom of the image with a transparent wavy line. And to make the wave look like it is flowing, I use a trigonometric function to calculate the part to be erased in a wavy shape.
It is hard to understand, so let's make figures.
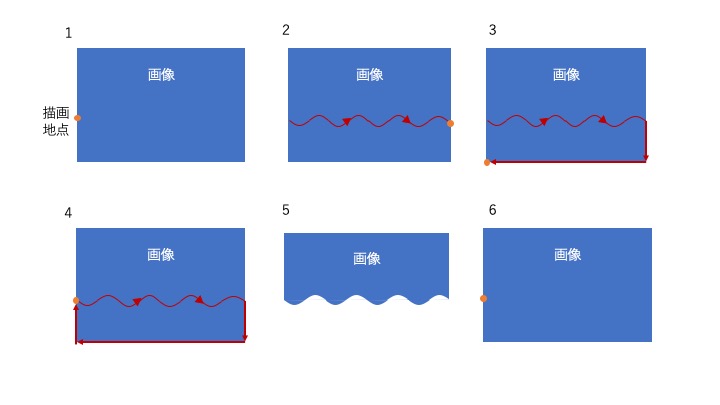
- Specify the drawing point as indicated by the orange dot in coordinates(1)
- Specify the drawing other points with trigonometric function.(2)
- When the point arrive at edge of image, back it to first place. (3、4)
- You can fill srrounded area with any colors, so fill transparently.(5)
- Rerender image as soon and do 1~5 again.
If you increase θ of sin(θ) each 1~6 process is repeated, it looks like a different wave swells each time. Implement the wave animation in this way.
What is canvas?
Canvas is one of the HTML5 elements. It can draw 2D shapes, graphics and animation with javaScript. It makes complex animation and shapes.
Render image on canvas
At first, let's display image on canvas element. This time, put the below files at the same level.
- index.html
- app.js
- sample.jpg
sample.jpg is trimed with 1:2 (verical:horizon).Yeah, let's develop! First step, create HTML as below.
<!DOCTYPE html>
<html>
    <head>
        <meta charset="utf-8">
        <title>waving image</title>
        <style>
            *{
                margin:0;
                padding:0;
            }
            main{
                background:rgb(240, 255, 255);;
            }
        </style>
    </head>
    <body>
        <main>
            <canvas id="canvas"></canvas>
        </main>
        <script src="./app.js"></script>
    </body>
</html>
Prepare canvas element which has id to detect with javascript. Next step, write js file.
Get target canvas element by Javascript
Write app.js code as below.
function initAnimation(){
    var canvas = document.getElementById('canvas');
    var ctx = canvas.getContext('2d');

    var imagePath = ('./sample.jpg');
    var image = new Image();
    image.src = imagePath;

    canvas.width = Number(window.innerWidth);
    canvas.height = Number(canvas.width/2);
    image.onload = function(){
          ctx.drawImage(image,0,0,image.width,image.height,0,0,canvas.width,canvas.height);
    }
}
This function get canvas element from HTML and context instance to operate with javascript. After that, various process are made for this ctx (drawing context instance).
var canvas = document.getElementById('canvas');
var ctx = canvas.getContext('2d');
and
var imagePath = ('./sample.jpg');
var image = new Image();
image.src = imagePath;

canvas.width = Number(window.innerWidth);
canvas.height = Number(canvas.width/2);
image.onload = function(){
        ctx.drawImage(image,0,0,image.width,image.height,0,0,canvas.width,canvas.height);
}
Set image's path to src property using Image Object. Set canvas size with canvas.width and canvas.height. So image ratio is 1:2, make canvas's ratio same.
image.onload run callback after image loaded.
drawImage() method renders image on canvas。
drawImage() must be run after image.onload to set image.
Anyway, run script. Image will be rendered even you don't use img tag.
How to use drawImage()
drawImage() draws image on canvas specify range. If you render image at whole canvas, you should enter all arguments.(MDN)
void ctx.drawImage(image, sx, sy, sWidth, sHeight, dx, dy, dWidth, dHeight);
Let me explain about arguments.
Image instance as well target image.
- X coordinate of the image cropping start point
- Y coordinate of the image cropping start point
- Distance in the X direction to cut out from the X coordinate specified by the second argument(width)
- Distance in the Y direction to cut out from the Y coordinate specified by the third argument(height)
- X coordinate of the starting point to draw on canvas.
- Y coordinate of the starting point to draw on canvas
- Distance in the X direction to draw from the X coordinate specified by the 6th argument(width)
- Distance (height) in the Y direction to draw from the Y coordinate specified by the 7th argument(height)
Like this. In my example this time,
ctx.drawImage(
    image,
    0,0,image.width,image.height,
    0,0,canvas.width,canvas.height
);
0,0,image.width,image.height cut image from (0,0) coordinate point of the image by the image's width and height. That same as to cut whole image.
If you set 0,0,image.width/2,image.height/2, canvas displays 1/4 size of original image.
0,0,canvas.width,canvas.height paste the image on canvas from (0,0) coordinate point by the canvas's width and height.
When you change ratio on code, you will well understand what I write above.
Cut image by wave shape
Let's cut image by wave shape. As I explained previwe of cutting above, draw square image which bottom line is wave shape and fill there transparent. Add below codes to image.onload function.
image.onload = function(){
    initDraw();
}

var canvasEndX = canvas.width;
var canvasEndY = canvas.height;
var waveStartPoint = canvasEndY-150;

var amplitude = 30;
var period = 1000;
var degree = 0;

function initDraw(){
    imageSet(image,canvasEndX,canvasEndY);
    waveDrawing(waveStartPoint,canvasEndX,canvasEndY,degree,amplitude,period);
}

function imageSet(imageObj,canvasEndX,canvasEndY){
    var imgWidth = imageObj.width;
    var imgHeight = imageObj.height;
    ctx.drawImage(image,0,0,imgWidth,imgHeight,0,0,canvasEndX,canvasEndY);
}

function waveDrawing(waveStartPoint,canvasEndX,canvasEndY,deg,am,tp){
    var waveStartY = waveStartPoint;
    ctx.globalCompositeOperation = "destination-out";
    ctx.beginPath();
    ctx.moveTo(0, waveStartY);

    for (var x=0; x <= canvasEndX; x+= 1) {
        var y = -am*Math.sin((Math.PI/tp)*(deg+x));
        ctx.lineTo(x, y+waveStartY);
    }

    ctx.lineTo(canvasEndX,canvasEndY);
    ctx.lineTo(0,canvasEndY);
    ctx.closePath();

     ctx.fillStyle = "rgba(255,255,255,1)"; //opacity 1
    ctx.fill();
}
I make new three functions there.
- initDraw():Call below two function.
- imageSet():Render image on canvas. If it is already rendered, clear it.
- waveDrawing():Cut image by wave shape
I explain these.
imageSet():Render image on canvas.
function imageSet(imageObj,canvasEndX,canvasEndY){
     var imgWidth = imageObj.width;
     var imgHeight = imageObj.height;
     ctx.drawImage(image,0,0,imgWidth,imgHeight,0,0,canvasEndX,canvasEndY);
}
This function just render image on canvas. When you set image object, canvas height and width at artguments, function use drawImage() to render image.
waveDrawing():Cut image by wave shape
waveDrawing()has process cutting image by wave shape.
function waveDrawing(waveStartPoint,canvasEndX,canvasEndY,deg,am,tp){
      var waveStartY = waveStartPoint;
      ctx.globalCompositeOperation = "destination-out";
      ctx.beginPath();
      ctx.moveTo(0, waveStartY);

      for (var x=0; x <= canvasEndX; x+= 1) {
           var y = -am*Math.sin((Math.PI/tp)*(deg+x));;
           ctx.lineTo(x, y+waveStartY);
      }

      ctx.lineTo(canvasEndX,canvasEndY);
      ctx.lineTo(0,canvasEndY);
      ctx.closePath();

      ctx.fillStyle = "rgba(255,255,255,1)"; //opacity 1
      ctx.fill();
}
Each parameters mean
- waveStartPoint:Start Y coordinate to write the wave.
- canvasEndX:X coordinate of the canvas's right edge.(max canvas's X coordinate)
- canvasEndY:Y coordinate of the canvas's bottom edge.(max canvas's Y coordinate)
- deg:Init degree.
- am:amplitude(This changes the wave's maxed height)
- tp:period(This changes a wave's maxed width)
You don't have to think hard. More incresing am higher wave. More increasing tp, gentle wave.
And ctx is the canvas instance you define above. It is global vars at this time.
Define the position to draw and Configure superposition
var waveStartY = waveStartPoint;
ctx.globalCompositeOperation = "destination-out";
ctx.beginPath();
ctx.moveTo(0, waveStartY);
ctx.globalCompositeOperation = "destination-out"; is very important to make the image transparent. MDN
globalCompositeOperation configure how the browser renders superposed shapes on the canvas. Remenber the below image.
This process fills the image by transparent within the area surrounded by a red line. When that, the already rendered image and the wave shape filled transparent are superposed.
The configure renderers only parts whitch the image and the shape are not superposed. So particular area will be transparent like no.5 of the above figure
Specify cut area
 ctx.beginPath();
 ctx.moveTo(0, waveStartY);
 for (var x=0; x <= canvasEndX; x+= 1) {
     var y = -am*Math.sin((Math.PI/tp)*(deg+x));;
     ctx.lineTo(x, y+waveStartY);
 }

 ctx.lineTo(canvasEndX,canvasEndY);
 ctx.lineTo(0,canvasEndY);
 ctx.closePath();
Next, I specify the cut range. That is 1~4 of the above figure. In this section, the word 'path' is often used. If you use Illustrator or Photoshop, you know it. Javascript also uses 'path' and specify the cut range.
Just in the case for who do not know 'path', I explain it. The path is the point that defines the shape. Drawing lines from point to point makes the shape. For example, the square has 4 points(edge) and, writing in one stroke from point to point makes the square. You define the path of writing in one stroke and position on the code.
ctx.beginPath()starts setting paths.ctx.moveTo(X,Y)moves the path to specify coordinates.ctx.lineTo(nextX,nextY)draw a line and move next coordinates.ctx.closePath()declear to end setting path.
In this article case,
- Start setting paths from (0, waveStartY).
0is the left edge of the image (X = 0) andwaveStartYis a start point for the wave. - Using
forand write the trigonometric function has x coordinates as sin argument, set paths and the paths. - When the path arrives at the right edge of the image, back to the start point via the edge of the right bottom and left bottom.
- Close paths.
Fill the selected area in transparent
You just fill after you select the area by above method.
ctx.fillStyle = "rgba(255,255,255,1)"; //opacity 1
ctx.fill();
fillStyle configures the color to fill. If you set globalCompositeOperation = "destination-out";`, there no problem to use any colors. fill()method fills the area surrounded paths. BecauseglobalCompositeOperation = "destination-out";`` is configured, the parts which the image and the shape are not superposed remains, but superposed area will be transparent.
If you come here, you get the image that is cut with the wave.
Implement animation by the loop.
Using defined functions imageSet() and waveDrawing(), set a loop fucntion.
function loop(){
      setInterval(function(){
      imageSet(image,canvasEndX,canvasEndY);
      waveDrawing(waveStartPoint,canvasEndX,canvasEndY,degree,amplitude,period);
      degree += 12; // 12 is feeling.
    },30)
}
The most important point is adding the number of angle with waveDrawing() like degree +=4. Thus, the wave is animated. More increase degrees, more fast the wave. If you set over 50, it will be rough waves.
And image.onload fires the loop() function.
image.onload = function(){
    initDraw();
    loop();
}
Whole code
Whole code is theb below.
window.onload = init();
function init(){
    initAnimation();

    function initAnimation(){
        var canvas = document.getElementById('canvas');
        var ctx = canvas.getContext('2d');

        var imagePath = ('./sample.jpg');
        var image = new Image();
        image.src = imagePath;

        //set canvas width and height
        canvas.width = Number(window.innerWidth);
        canvas.height = Number(canvas.width/2);
        image.onload = function(){
                initDraw();
                loop();
            }

        var canvasEndX = canvas.width;
        var canvasEndY = canvas.height;
        var waveStartPoint = canvasEndY-150;

        var amplitude = 30;
        var period = 600;
        var degree = 0;

        function initDraw(){
            imageSet(image,canvasEndX,canvasEndY);
            waveDrawing(waveStartPoint,canvasEndX,canvasEndY,degree,amplitude,period);
        }

        function loop(){
            setInterval(function(){
                imageSet(image,canvasEndX,canvasEndY);
                waveDrawing(waveStartPoint,canvasEndX,canvasEndY,degree,amplitude,period);
                degree += 12;
            },30)
        }

        function imageSet(imageObj,canvasEndX,canvasEndY){
            var imgWidth = imageObj.width;
            var imgHeight = imageObj.height;

            ctx.globalCompositeOperation = "destination-over";
            ctx.drawImage(image,0,0,imgWidth,imgHeight,0,0,canvasEndX,canvasEndY);
        }

        function waveDrawing(waveStartPoint,canvasEndX,canvasEndY,deg,am,tp){
            var waveStartY = waveStartPoint;
            ctx.globalCompositeOperation = "destination-out";
            ctx.beginPath();
            ctx.moveTo(0, waveStartY);

            for (var x=0; x <= canvasEndX; x+= 1) {
                var y = -am*Math.sin((Math.PI/tp)*(deg+x));
                ctx.lineTo(x, y+waveStartY);
            }

            ctx.lineTo(canvasEndX,canvasEndY);
            ctx.lineTo(0,canvasEndY);
            ctx.closePath();

            ctx.fillStyle = "rgba(255,255,255,1)"; //opacity 1
            ctx.fill();
        }

    }
}
If you change the wave
In this case,
var amplitude = 30;
var period = 600;

function loop(){
      ...
      degree += 12;
      },30)
}
amplitude defines the wave's height and period is the width of the wave and degree += is velocity. On the other, by changing the trigonometric function you configured in waveDrawing(), you can render
At last
That is all how to make the image waved. Canvas element can render complex animation like this.